SpamVault Client Setup Resources
Welcome to SpamVault’s email spam and virus filtering service. As a valued SpamVault client, we have put together some helpful information for you. This includes your initial mail server setup as well as resources on recommended settings which can improve your spam and virus filtering results.
Remember, SpamVault is here to help. If you have additional questions or require further assistance, we can be reached at 855-772-6858 or send us an online Client Support request.
 Mandatory
These are required settings to properly setup your mail server to use SpamVault. Mandatory
These are required settings to properly setup your mail server to use SpamVault. Suggested
These are recommended settings you can take advantage to improve your spam and virus filtering results. Suggested
These are recommended settings you can take advantage to improve your spam and virus filtering results. Optional
These are additional settings you can configure to improve the management of your spam and virus filtering. Optional
These are additional settings you can configure to improve the management of your spam and virus filtering.
Change Your MX Record
You have to tell the Internet to send e-mail addresses to your domain "yourdomain.com" to the SpamVault Spam Protect service so we can filter it for you and send the clean e-mail to your mail server. To do this you, or your Internet Service Provider (ISP), will have to make a change to the DNS records for your e-mail domain.
Specifically you have to change your MX records to your ** Per-Domain MX record (yourdomain.email-mx.com).
Once this change is made to the DNS records there will be a short lag for this change to reach the entire Internet. This time lag is entirely dependent on your Time to Live (TTL) value on the DNS records for your e-mail domain.
**When you sign up with SpamVault, you will receive an email with a Per-Domain MX Record which is just for your company.
Once the MX records have changed you can check that they are correct by using the 'nslookup' command from a command prompt as per the example below or use a site like http://www.dnsreport.com, http://www.intodns.com, or http://www.geektools.com/digtool.php to look up the MX record for your domain.
Example - from a DOS or command prompt in windows type the following command:
nslookup -type=mx yourdomain.com
The answer should look similar to the following.
yourdomain.com MX preference = 10, mail exchanger = yourdomain.email-mx.com
Please contact us at support@spamvault.net if you need any advice or assistance with this step.
Recipient Verification – Protect Your Mail Server
Recipient filtering is required and important because it protects your server from various types of dictionary attacks, and improves performance due to the fact that it does not have to handle all of the invalid mail sent to your server.
Many spammers attack email infrastructures by harvesting email addresses. The Barracuda Spam & Virus Firewall verifies the validity of recipient email addresses through multiple techniques.
- Protocol compliance: Before even validating a recipient, SpamVault validates that the recipient is specified properly. An example of an enforcement policy includes forcing RFC 821 compliance.
- Custom policies: Your organization can define your policies based on allowed recipient email addresses for which spam scanning should be disabled. You can also define your own block lists based on email addresses. Note that allow lists override block lists.
- LDAP recipient verification: You can choose to reject messages if the recipient email addresses do not appear in the LDAP directory.
- SMTP recipient verification: By default, SpamVault rejects messages if the downstream mail server does not accept mail for that recipient.
Why It’s Important
There are advantages to Recipient Verification and Validation:
- Reduces the bandwidth load on your mail server.
- Reduces the “back scatter” that can get your mail added to blacklists. (Once you are on a blacklist(s), it can be extremely difficult and time consuming to get off of them.)
Configuring Your Firewall
Once email is flowing through the SpamVault spam and virus filtering service, you need to configure your firewall to allow inbound access from our IP destination. Make sure your firewall is configured to allow inbound SMTP (port 25) traffic to your mail server from SpamVault with this IP address: 209.141.111.62.
Please contact us if you need any advice or assistance with this step.
Authenticated Inbound Secondary Port?
This is what we recommend you to do if you have remote users that need to send email through your mail server via SMTP.
With the application of spam filtering techniques like Sender Policy Framework (SPF) it is getting more and more critical that all e-mail from your domain flow through your mail server so that it does not get blocked as spam. The standard SMTP port used by SpamVault (TCP 25) should be locked down or firewalled so that spammers don’t try and do an end run around the spam protection offered by SpamVault - so where does this leave your remote users?
One technique that works well with remote users is to use a second SMTP server or service on a different port (465 and 587 are popular) and require that they authenticate before letting them send the email. Your users can then talk through your firewall, be authenticated, and send email to both others in your company or to people outside. These emails will be coming from your mail server and thus pass the SPF record check and not be blocked as spam.
Using SpamVault with Microsoft Exchange™
Recipient filtering is important as it protects your server from various types of dictionary attacks, and improves performance due to the fact that it does not have to handle all of the invalid mail sent to your mail server.
If you could enable this feature, it would increase the security of your domain(s) and mail server.
New User Setup
Now that your company has successfully migrated to SpamVault, each user will be required to create a SpamVault account in order to access and manage your quarantine emails and preferences. Follow the below steps to crate your account and customize your settings:
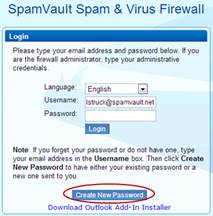
- Enter your email address and click on the Create New Password button.
- You will receive an email from SpamVault with your password.
- Go back to the SpamVault login screen and enter the system assigned password.
- Click on the Login button and don’t forget to change your password.
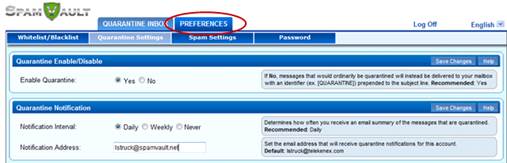
- Go to the Preference tab.
- From here, you can access and manage your Whitelist/Blacklist, Quarantine, Spam, and Password.
- Manage Quarantine Messages
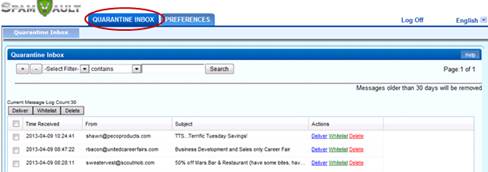
- Go to the Quarantine Inbox tab.
- All your messages that have been quarantine within the past 30 days will be listed here. You can go through the messages and choose to Deliver, Whitelist, or Delete them.
User Outlook™ Integration
To enhance your email management and reporting capabilities, many SpamVault clients find the Microsoft Outlook Plugin very useful.
As you know, all incoming email goes through SpamVault’s spam and virus filtering service before going to your mailbox. Once the emails are in your mailbox, you can take advantage of our Outlook Integration to effectively and quickly manage your emails, identifying which email is safe to deliver or delete.
To download the plugin for Outlook Integration, click on: https://portal.spamvault.net/cgi-mod/index.cgi and click on the Download Outlook Add-In Installer. Make sure you close your Outlook before downloading.

When you get a potential spam email, click on the Mark as Spam icon, it’s that easy! This action has identified this email is spam and send to SpamVault’s email filtering service, and in the future when it receives email similar to the one you reported, it will recognize it as spam.
|
Resource Center
|
